Set the Auto QC Options
While QCing documents for a Processing Job, you can use the auto-QC function to automatically scroll through a portion of the documents’ pages.
To Set Auto-QC options:
-
On the QC menu bar, click Tools > QC Options.
-
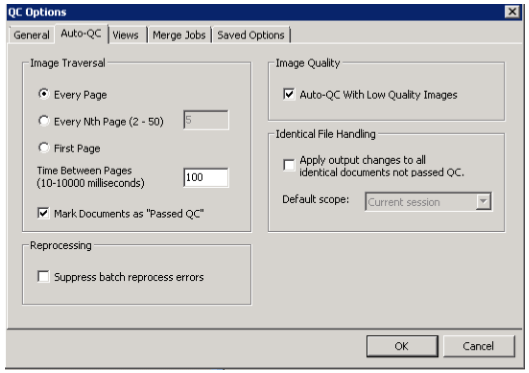
Click on the Auto-QC tab. The Auto-QC options control the portion of images to be viewed and the speed at which the program scrolls through the images.
- In the Image Traversal section of the dialog, set the portion of images to be displayed during auto-QC. The options are:
-
Every Page - Use this setting to do 100% QC or to display every page during auto-QC.
-
Every nth Page - Use this setting and enter a number. For example, enter 2 to display every other page.
-
First Page - Use this setting to have auto-QC display the first page of each document without displaying any additional pages in the documents.
-
Time Between Pages - Set the number of milliseconds the program should display each image. 100 ms is a tenth of a second; 10000 ms is 10 seconds.
-
Mark Documents as “Passed QC” - When selected, the “Passed QC” flag is automatically applied.
-
In the Reprocessing section of the dialog, check Suppress batch reprocess errors.
- This option automatically suppresses any errors (via dialogs) encountered during multi-document reprocess operations, which allows the reprocessing to continue.
- It applies when using normal reprocessing, reprocessing using the shell execute print command, and reprocessing ADD Imaging documents.
- This option is not applicable for single document reprocessing.
- This option is not applicable for those errors that may be handled by the Dialog Dismisser. By default, the option is disabled.
- In the Image Quality section of the dialog, uncheck the Auto-QC with Low Quality Images to get the best possible image quality. This can slow down the auto-scroll QC process.
- In the Identical File Handling section of the dialog:
- Select the option, Apply output changes to all identical documents not passed QC, to automatically apply any reprocessing changes for a given document to all documents with the same MD5 hash value which have not passed QC. This eliminates repetitive work by applying corrected output to any duplicates.
Select a default scope from the Default Scope drop-down list. Options include: Current Session, Job Level, Custodian Level, Case (Project) Level, and Client Level.
The selected scope is where the system will check for identical documents.
-
When a single item is selected, and either the Reprocess Selected button
 or the Reprocess in Native Application button
  is clicked, the following processing steps take place.
-
In general, the reprocess completes normally. However, any errors will interrupt the workflow.
-
After a successful reprocess, a dialog displays indicating the number of duplicates found within the selected scope and prompts if output replacement should continue. Click Yes.
The Apply Output to Identical Files progress dialog appears indicating the progress of the transfer followed by the Operation Complete dialog.
- Click OK.
-
- To start the auto-QC function, in the QC Functions toolbar below the Documents List, click
 .
. - During auto-QC, you cannot accept, reject, or reprocess items while scrolling through the images unless Mark Documents as Passed QC is selected.
- To stop the Auto-QC function click
 again.
Related Topics